Bought a Used Tesla? Check Keys, Sentry Recording and Phone Alerts
After buying a used Tesla, make its security setup your own: complete the ownership transfer, check who can access the car, confirm it saves recordings, and connect alerts to your phone. Do these checks with your own account and keys before relying on the car’s existing setup.
Bring your phone, the key cards supplied with the car, and your purchase documents to the handover. Leave time to resolve account or key problems while the seller or dealer is available.
| Check | What you want to establish |
|---|---|
| Tesla account | The ownership transfer is complete in your account. |
| Keys and drivers | You have a working key and have reviewed who has access. |
| Recording | A recent clip from your own drive saves and plays. |
| Parking settings | Sentry Mode and location exclusions match where you park. |
| Phone alerts | The right account, vehicle and notification settings are in use. |
1. Complete ownership in your own Tesla account
Being added as a driver is different from owning the vehicle in Tesla’s system. If the seller has invited you to use the car through their account, complete the ownership transfer as well.
For a third-party purchase, Tesla’s app process starts at the menu in the top-right corner, then My Products → Add Product. Follow the prompts to submit the VIN, ownership documents and your details. A vehicle bought directly through Tesla is added automatically. Use Tesla’s ownership-transfer guidance for the process that applies to your purchase.
Use your own Tesla login throughout. Keep the purchase paperwork handy and respond to any request for additional information. If the transfer is still pending, resolve that with Tesla and the seller rather than trying to fix it through a third-party app.
2. Review drivers and keys separately
Once ownership is complete, open the vehicle in the Tesla app and review Security & Drivers → Manage Drivers. Remove access that should no longer remain. Tesla’s driver-management instructions explain the removal and confirmation steps.
Then check the keys stored in the car. On Model Y, Controls → Locks lists phone keys, cards and key fobs. Identify the cards handed over to you, set up your own phone key, and verify that you can lock and unlock the car before removing obsolete keys.
Keep a working card with you as a backup. Model Y requires an authenticated key to confirm a key deletion and retains at least one authenticated card or fob. Follow the key instructions for your vehicle when pairing or removing access; the linked Model Y manual shows the touchscreen sequence.
Avoid guessing from a generic label such as “Phone” or “Key Card.” Work out which physical key or person’s phone it belongs to first. This is a useful handover task to do together, before the seller leaves.
3. Check that the car actually saves video
A used car may arrive with a USB drive already plugged in. Check it before depending on it: use a data-capable USB port, inspect any recording warning, and make sure the drive is suitable for the car. Some center-console ports only charge devices; the glovebox data port is the appropriate choice where fitted.
Tesla’s current Model Y requirements include at least 64 GB, a sustained write speed of 4 MB/s, USB 2.0 compatibility and a supported format. If you need to format the drive, back up any footage or files you need first. Formatting erases the drive. Tesla documents the in-car option at Controls → Safety → Format USB Drive. USB requirements and formatting.
Next, make a simple recording check during ordinary use:
- Enable Dashcam and check that its icon indicates recording.
- After a normal drive, save a recent clip using the Dashcam controls.
- With the car in Park, open the Dashcam viewer and play the clip.
- Check its time and content so you know you are looking at your own recent recording.
These controls are described in Tesla’s Dashcam instructions. A playable Dashcam clip checks the recording setup; next review the parked Sentry settings. If you later need to keep footage from an incident, follow our Sentry footage preservation checklist.
4. Choose where Sentry Mode should stay on
Enable Dashcam and Sentry Mode, then check Sentry’s status when the car is parked and locked. Review Exclude Home, Exclude Work and Exclude Favorites, together with the saved addresses they use. Set them for your parking habits rather than assuming the previous setup suits you.
Tesla’s Model Y manual explains that a manual Sentry change can override those exclusions until the next drive. Check again after driving to your usual parking place. It also says Sentry turns off in Low Power Mode and uses additional power while active. Tesla’s Sentry Mode settings.
Decide what you want for your driveway, work car park and overnight street parking. For a longer stay, consider the charge you will need when you return. Our Sentry Mode guide explains the broader settings, and the battery-drain guide covers the parking trade-off.
5. Connect Sentry Pro to your account and phone
If you use Sentry Pro, authorize it with your Tesla account and select the vehicle you have just bought. Check the selected car before changing any alert settings, especially if you also own another Tesla.
Complete the connection prompts shown for that vehicle. If Sentry Pro asks you to add its virtual key, finish the Tesla app flow and return to Sentry Pro. If it directs you to enable Allow Third-Party App Data Streaming in the car, follow that prompt instead. Continue until the vehicle connection is configured; an unresolved connection error needs attention before phone-notification troubleshooting.
Review Permissions
Open the account area, then Permissions. Check Vehicle Information, which is required, and review optional access for the features you want to use. Vehicle Commands allows command-based controls such as enabling Sentry Mode from Sentry Pro. Use Manage permissions if you need to change the Tesla authorization.
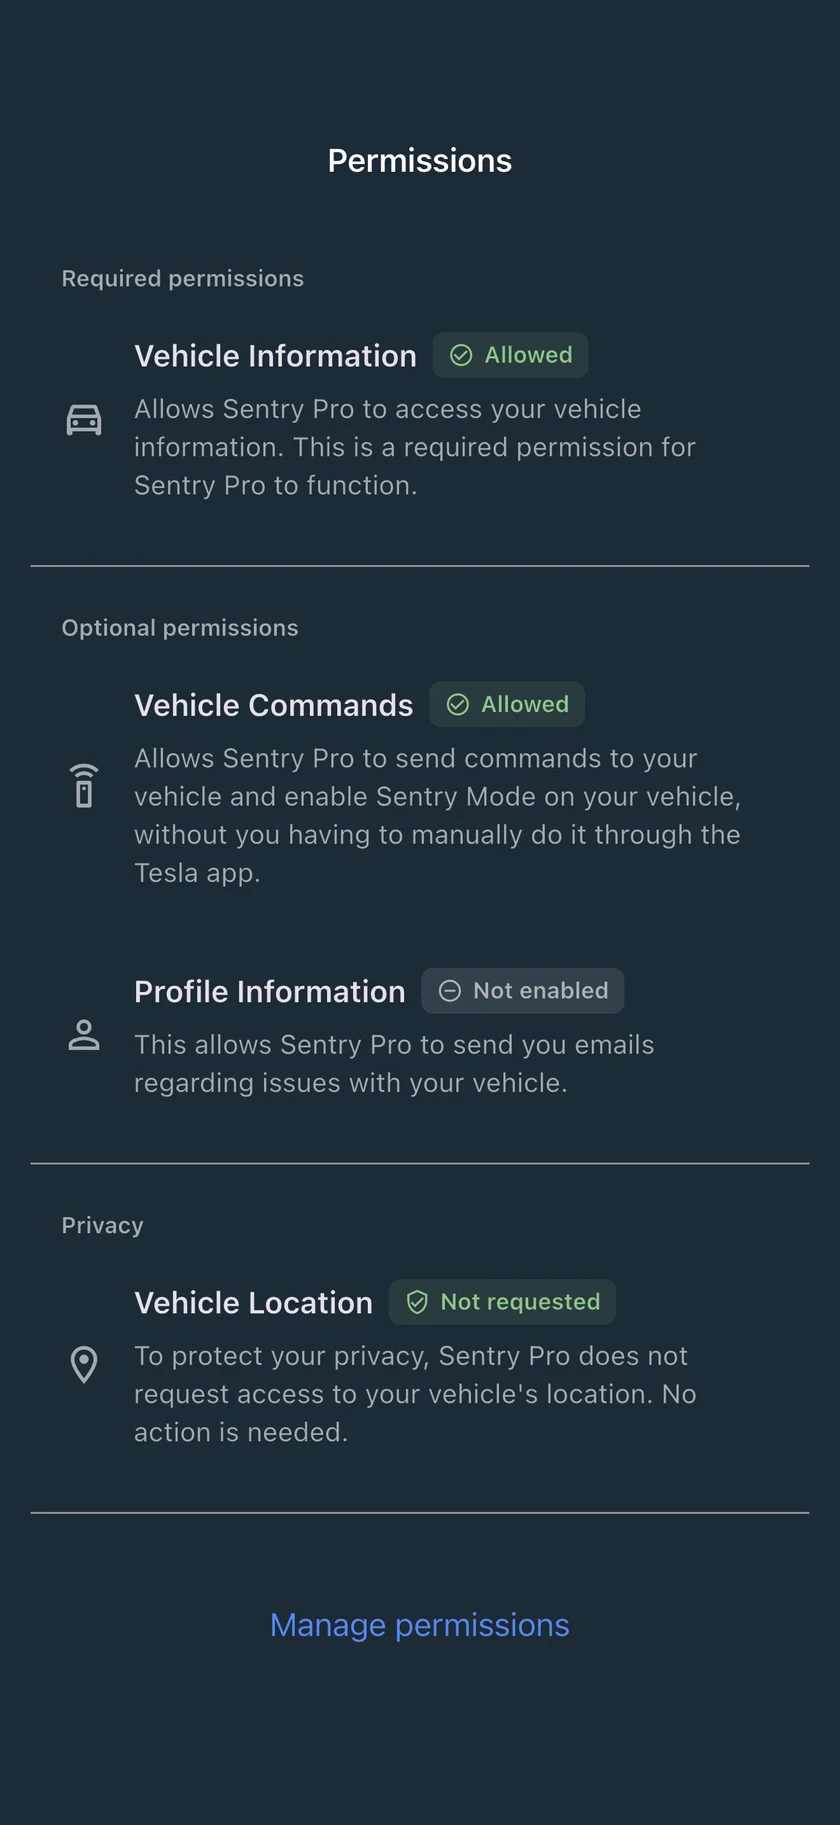
Check the subscription status in the account area too. Establish what access your account has instead of relying on a seller’s description of their setup. If you already use Sentry Pro and your existing access is missing, contact support before purchasing again.
Check alerts on the phone you will carry
Review Sentry Mode notifications for the selected vehicle and address any notification warning in Sentry Pro. Allow notifications in the phone’s settings and check how sounds and interruptions are handled. For the iPhone and Android steps, use our phone notification checklist.
During normal use, check the next Sentry Pro notification on that phone: which vehicle it names, whether it appears on the lock screen, and whether you hear it. If it does not arrive, note the time and any app warning so support has something specific to investigate.
Check recordings separately from phone alerts. Tesla documents security alerts in its own app without USB recordings, as well as recordings that do not trigger an alarm notification. Judge the USB setup by a saved clip you can play. Tesla’s explanation of Sentry recordings and notifications.
If a handover check fails
| What you see | Next action |
|---|---|
| Ownership is pending in the Tesla app | Check Tesla’s request and any missing documents or seller action. Resolve ownership first. |
| The car appears in Tesla but not Sentry Pro | Confirm which Tesla account you authorized and review Permissions. Contact support if it remains missing. |
| Dashcam reports a drive problem or no clip plays | Check the USB drive, data port and recording status. Save needed files before formatting. |
| Sentry does not stay on where you park | Review location exclusions and the car’s power status, then recheck after the next drive. |
| Sentry Pro is connected but the phone stays quiet | Check subscription status, vehicle notifications and phone permissions; note any warning and an example time. |
For a Sentry Pro problem, contact support with your phone model, app version, exact warning and when it occurred. Say whether the car is missing, a connection step is failing, or a notification is absent; each points to a different part of setup.